Search and Delete an Email from office365.

Here is the steps to find and delete a specific mail from mailbox(s) from the office365 exchange.

1. Install PowerShell 7 using the following command:  winget install –id Microsoft.Powershell –source winget . Because complaince task need new PS.

2. PowerShell 7 will install side-by-side with your current version of Powershell. You will be able to find it using Search or in Start->All Programs. Start it

3. Install the Exchange Online Management Module using the command : install-module exchangeonlinemanagement

4. Connect to Exchange Online using the command: connect-exchangeonline. You will be asked to authenticate using your credentials ( Make sure the account that using has proper permission)

5. Connect to Security and Compliance Online using the command:  Connect-IPPSSession. You will be asked to authenticate using your credentials

6. Create a new compliance search: New-ComplianceSearch -Name “Give it a title” -ExchangeLocation All -ContentMatchQuery ‘(Received>=10/22/2020 -AND Received<=10/25/2020) AND (Subject:”provide words/phrase to look for in the subject”) AND (From:sender email address)’

7. Start the search with the command: start-compliancesearch “use the title you gave it above”

8. Check on the status of the search with the commanD: get-compliancesearch “user the title you gave it”. You can also use the command – get-compliancesearch “user the title you gave it” | fl, for more details and find out if any emails were found. You will not see a list in the results, but just a number.

9. If there were emails and you want to delete them then use the command: New-ComplianceSearchAction -SearchName “provide the title from above” -Purge -PurgeType SoftDelete

10. Check on the status: Get-ComplianceSearchAction “the title from above and append _purge”

References: 

1. https://learn.microsoft.com/en-us/powershell/exchange/connect-to-scc-powershell?view=exchange-ps 

2. https://learn.microsoft.com/en-us/purview/ediscovery-search-for-and-delete-email-messages

3. https://adamtheautomator.com/office-365-delete-email/

Install Patch on ESXI Server

I’m not going to detail the steps here to update the ESXI server. These are quick steps to get your ESXI server updated via the VMware patch bundle. In this installation, I have patched the ESXI 7.0U3 server to the latest 7.0U3o patch level.

Go to vmware and download the patch bundle VMware-ESXi-7.0U3o-22348816-depot.zip and upload it to your ESXI server datastore.

Then note down the store location, safely shutdown or move servers, and put the host in maintenance mode.

SSH into the server and run( Make sure to edit your line as needed for file location, esxcli software sources profile list -d /vmfs/volumes/Store1/ISO/VMware-ESXi-7.0U3o-22348816-depot.zip

It will shows package content

Then run ( in this insttance I have selected esxi standard) esxcli software profile update -d /vmfs/volumes/Store1/ISO/VMware-ESXi-7.0U3o-22348816-depot.zip -p ESXi-7.0U3o-22348816-standard

After sometimes, you will see a notifcation that update has been completed and server needs a reboot

Go ahead and reboot and done.

Here is some links for detail ver of above,

https://www.youtube.com/watch?v=UOFf56VuodU

https://www.vinchin.com/en/blog/esxi-update-upgrade.html

https://docs.vmware.com/en/VMware-vSphere/7.0/com.vmware.esxi.upgrade.doc/GUID-FE668788-1F32-4CB2-845C-5547DD59EB48.html

https://www.experts-exchange.com/articles/34250/HOW-TO-Update-VMware-ESXi-7-0-GA-to-ESXi-7-0b-in-5-easy-steps.html

How to import IP address in bulk to Palo Alto Firewall

***Prepare Text file with all the address needed,

set address test ip-netmask 10.0.0.1
set address test2 ip-netmask 10.0.0.2
set address test33 ip-netmask 10.0.0.3

***SSH into PA CLI and enter configure, Now past the what you copied from text file. You can enter ” show address” to see added address

***If you want to add thses to address group same as before prepare text file and enter those to CLI

set address-group MyCustomAddressGroup static test
set address-group MyCustomAddressGroup static test2

***Enter "commit” to commite the changes

***See the address group “show address-group”

More info https://live.paloaltonetworks.com/t5/general-topics/how-to-import-address-objects-in-csv-to-pa-firewall/td-p/453559

In Place Upgrade ADFS Server 2012 to 2019

Recently, I had the opportunity to upgrade ADFS server runs on 2012. I was able to upgrade 2012 server to 2019 via Windows in-place upgrade without reconfiguring or rebuilding entire server. This a very brife write up on how to do this.

**It is best to backup or take a proper snapshot of the server before any changes. In my case vmware snapshot was the option.

**First, insert 2019 ISO to the 2012 server and bring up PS shell as a admin and then browse to the ISO folder( in my case it was d:\support\adfs). You will be able to see two PS script one for export and another for import. We are gonna use the export, run( Make sure that you have created appropriate folder first to export the data)

export-federationconfiguration.ps1 -path c:\adfs_backup

Once the export done make sure to take a screenshot or note down all the adfs server name and stuff show end of the script. This is important, since you gonna need to install adfs after the upgrade.

**Then I copied that contetnt from adfs_backup folder to my desktop, just incase things goes south 🙂

***Then Export the certificate with the private key to safe location. Usually server woudn’t purge any certs during the in place upgrade but its better to be safe.

***Then go ahead and do the upgrade of 2012 to 2019. Once done, re-install adfs role on the server using the same name and properties showen end of the script run from the first step and do the basic config.

***Once ADFS done, brows to the ISO d:\support\adfs import the federation data that was exported from the old ADFS run via PS Shell

import-federationconfiguration.ps1 -path  c:\adfs_backup

***Make sure al the certs properly inplace using certmanger via MMC

***Bring PS Shell and run,

$FormatEnumerationLimit=-1
Get-ADFSProperties

Set-ADFSProperties –ExtendedProtectionTokenCheck None

Set-AdfsProperties -WIASupportedUserAgents ((Get-ADFSProperties | Select -ExpandProperty WIASupportedUserAgents) + "Chrome" + "Mozilla/5.0")

***Then finally test out the ADFS!

Please find great write up here,

https://ezcloudinfo.com/2017/02/20/easy-migration-steps-from-adfs-2-0-to-4-0/

https://www.ibm.com/docs/en/security-verify?topic=directory-configuring-adfs-windows-integrated-authentication

https://help.hcltechsw.com/domino/10.0.1/admin/secu_enabling_iwa_adfs30.html

Cert will not show in IIS after import

Some hosting providers will not provide a traditional SSL cert. This is especially true if you decide to use wild card SSL on your internal IIS server, while it is an issue to your web server hosting provider. In many cases a cert will be provided as a .cer and key file.

But IIS will not take .cer since it will be missing a private key. In this case easy solution is to convert .cer and key file to.pfx.

This site explain in detail how to do that https://www.sslmarket.com/ssl/how-to-create-an-pfx-file

But if you need a quick solution, you can easily use this online tool to perform that task and generate the pfx and install it on your IIS.

https://www.sslshopper.com/ssl-converter.html

Image Capture Wizard Fails With Error Code (0x00004005)

This is a solution to resolved image capture error from SCCM while capturing standard image. I was able to successfully resolved error code while I was trying to capture Win 10 latest update image. Basically issues caused my APPX package on Windows store. Only solution is to get rid appx associated profile, so SCCM wouldn’t have to do some extra work which bound to fail :). My case my image was on VM which allowed me to take lots of snapshots which saved me tones of time. Hope this will help some of you.

All the credits goes to here. I had to do some changes in my process while I was doing this.

1.  Run the Powershell command  ‘Get-AppxPackage | Remove-AppxPackage’

2. Configure your registry settings for SysPrep.

  1. Open regedit and look for:
  2. HKEY_LOCAL_MACHINE\SYSTEM\Setup\Status\SysprepStatus\CleanupState\ 
    Set to value: 2 ( My case this wasn’t there)
  3. HKEY_LOCAL_MACHINE\SYSTEM\Setup\Status\SysprepStatus\GeneralizationState\ 
    Set to value: 7 ( This was already set to 7)
  4. HKEY_LOCAL_MACHINE\SOFTWARE\Microsoft\WindowsNT\CurrentVersion\SoftwareProtectionPlatform\SkipRearm 
    Set to value: 
  5. Then, run the command:msdtc -uninstall (wait a few seconds) 
    msdtc -install (wait a few seconds) ( My case I didn’t see anything happened but who knows ran it anyways)

3.  Next Steps to resolve appx,

  1. Run the Import-Module Appx PowerShell cmdlet
  2. Run Import-Module Dism
  3. Run Get-AppxPackage -AllUser | Where PublisherId -eq 8wekyb3d8bbwe | Format-List -Property PackageFullName,PackageUserInformation
  4. Run Get-AppxPackage -AllUser | Where PublisherId -eq 8wekyb3d8bbwe | Remove-AppXPackage
  5. On my VM I saw all my two accounts had the appx, so I created another local admin account and log in with that new account.
  6. After with the new account I have delete whatever account is tied to all of my Appx packages.
  7. Reboot the computer and login to your new admin account.
  8. Capture the image as your new admin account.

Also here is the place to see the error on capture process.

C:\Windows\System32\Sysprep\Panther

following files has the issues related to capture.

  • setupact.log
  • setuperr.log

Cisco ISR 4331 IOS and ROMMON Upgrade

Here is the steps to upgrade ISR 4331 GW. You will need to upgrade ROMMON upgrade first if you are going from older ver to new ver. This is specially true when you receive RMA from Cisco for trouble device. Once the upgrade done make sure to enable smart license (Most of the time I keep questioning ” Smartness” ) and get that activated.

ISR4331 – Cisco recommended IOS-XE release 16.12.05 & ROMMON version 16.12(2r).


Step 1:
Copy both ROMMON and IOS images to the bootflash of ISR

copy tftp: bootflash:
copy ftp: bootflash:
copy scp bootflash:

Step 2: Verify MD5 Checksum for both the files.


verify /md5 bootflash:isr4300-universalk9.16.12.05.SPA.bin

verify /md5 bootflash:isr4200_4300_rommon_1612_2r_SPA.pkg

Step 3: Upgrade the ROMMON on the router with the following command

upgrade rom-monitor filename bootflash:isr4200_4300_rommon_1612_2r_SPA.pkg all

Note: Please wait until this process finishes and do not interrupt

Then reload the system to make sure it boots properly.

Step 4: Now set the new boot statement in order to be able to load the new code on the device using the following commands
conf t
no boot system
boot system flash bootflash:isr4300-universalk9.16.12.05.SPA.bin
end
Write

Step 5: Verify that the boot variable points to the new image using the following command.
show bootvar

Step 6: Now reload the device using the following command
reload

Filezilla Server Setup

It seem that new version of Filezilla Server tend to confuse many of us with introduction with complete new UI. This is a basic quick setup of Filezilla Server and some explanation for confusing steps.

***Download FIilezilla from https://filezilla-project.org/ and those who want older version of product here is the link https://download.filezilla-project.org/server/

****Once downloaded start the installer and go through process and make sure to setup admin password to access the server and if you prefer change the admin port number from default one during the installation.

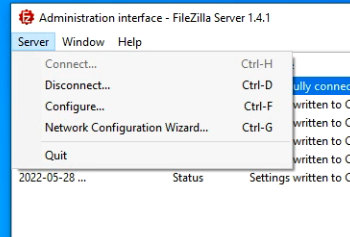
****Next open Filezilla admin interface and click on server and configure

**** Click on server listener and setup listing IP to accept incoming FTP request, usually this is leave as 0.0.0.0 to listen to all address. Also you can define whether you want to you explicit TLS or not.

**** Next click on Users and add user and password. This will be the user / psw that you will be need when connecting from FTP client. Important line on here is virtul and Native path,

Virtual path is slimier to Linux directory and this will be the name directory show when client connect and you can /whatever the name you like. Native Path is where will be this file will be actually save, basically real directory path in computer where data will be saved. Note that Filezilla Server doesn’t support network path.

***Next Apply setting and done!. Server setup is complete.

Note that I didn’t go into detail to setup certs and all other setup. This is a quick and dirty FTP server 🙂

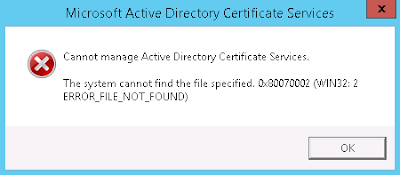
An error occurred while enrolling for a certificate.The certificate request could not be submitted to the certification authority.The RPC server is unavailable.

Recently I had upgraded Root cert server OS ver from 2012 to 2019 via in place upgrade. Yes, I know it is not the most ideal way but I had my reasons 🙂

After upgrade none of the help desk staff was was able to connect to root cert server via MMC or none of the PC was able to request certs. So everyone was in help desk wasn’t happy 😦 But user was able to request certs and domain admin was able to connect to cert MMC and issue them. Since the PC wasn’t able to request any certs and end up in breaking SCCM communication which was done via PKI. So error I was getting was this,

After many search one of the post from here save the day and it was issue with DCOM error caused by the in place upgrade, how? I have no idea 🙂 https://theitbros.com/the-rpc-server-is-unavailable-0x800706ba/

Solution was this in my case,

In the AD search for Certificate Service DCOM Access and add Domain computers/Users/domain controllers as members

Then go to root CA server and run in cmd in admin mode.

certutil -setreg SetupStatus -SETUP_DCOM_SECURITY_UPDATED_FLAG

net stop certsvc & net start certsvc

After this I was able to resolved my issue.

Error: ‘Invalid Argument provided. Java Server startup failure.’ when creating or refreshing a report using a JDBC

First make sure you have correct OJDBC or JDBC file.

Then copy that file to the java lib location, in my case D:\Program Files (x86)\SAP BusinessObjects\SAP BusinessObjects Enterprise XI 4.0\java\lib

Then open CRConfig.xml and add the path location as shows below

https://userapps.support.sap.com/sap/support/knowledge/en/1527666

https://userapps.support.sap.com/sap/support/knowledge/en/1219417